For our first application we shall look at a very simple database for the organisation that we referred to in the previous page. The data we shall need will be:
Employee number
IRD number
Full Name
Commencement Date
Finishing Date
Address 1
Address 2
Contact Phone
Hourly Rate
Tax Rate
Department
Current
These items above are the names specified in the previous page
Creating a new Access database is like creating any new object using other software such as Word, Excel etc. The steps are:
Ensure that Microsoft Access is running
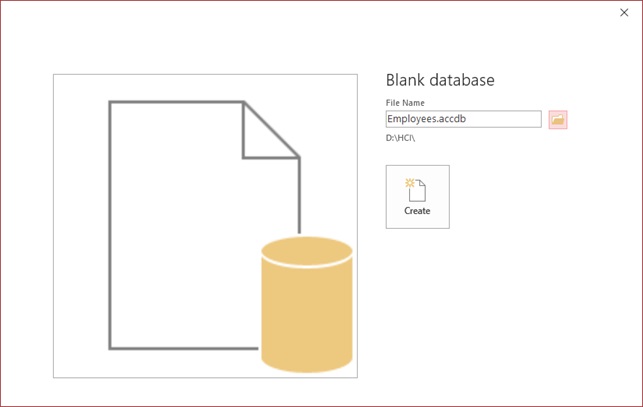
Click on File/New. This will give you a display as in Fig 1 below.
From Available Templates select Blank Database and in the box labeled File Name enter the name of the database.
Click on the button Create.
Fig 1
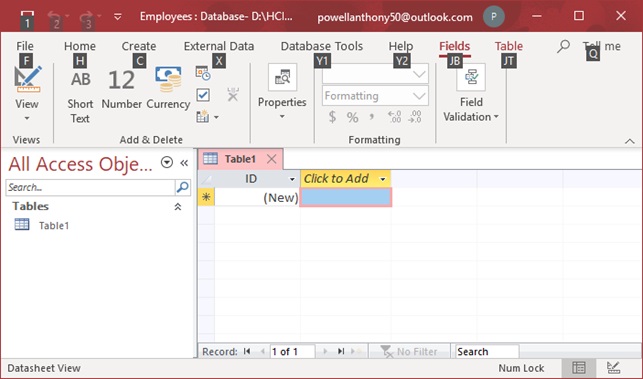
Our new database now appears as in Fig 2 below
Fig 2
There are many different objects that we can put into a database. These include tables, queries, forms, reports, web pages, macros and programming code. Of those we have examined the concepts of tables very thoroughly in the previous chapter. Here, before actually creating a table we shall take a quick look at queries, forms and reports.
Queries: this is a way of selecting from all of the data stored only the data that we want for a particular application. Queries are extremely useful when we are trying to extract data from more than one table.
Forms: A GUI interface that allows us to look at a table one record at a time. A form will also allow us to enter data into the table.
Reports: Paper printouts of part of the data in the database. Usually they are subtotaled.
When you create a new database, Access automatically creates a new table for you. If it does not or if you wish to create a second table you simply go to the Create tab and click on the icon Table. Either way you get a display as shown in Fig 2 above. The first thing you must do is to save the table. As we are going to enter employees’ data into this table we shall call it Employees. To save the table, simply right click on the tab that has the table’s name on it. In Fig 2 the table’s name is Table 1. Once you right click a pop up menu appears and among the options is Save. Once you select this option a dialogue box appears asking for the table’s name. Here you enter Employees and then click on OK. Now the name Employees will replace the name Table 1 in the table’s tab.
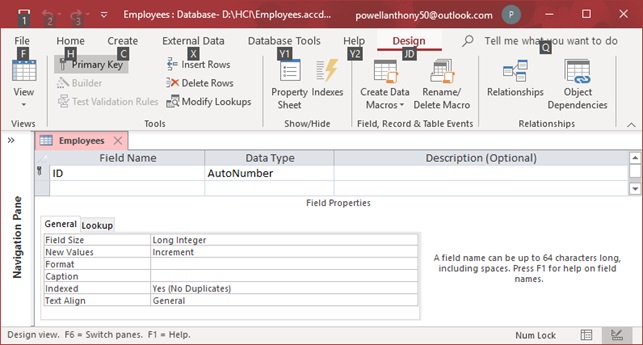
As your table is newly created it has no fields in it. Your first task therefore is to add fields to the table. To do this, however, you must change the table display to Design View To do this, again right click on the table’s tab, and from the pop-up menu select Design View. This alters the display as shown in Fig 3 below.
Specifying Field Names and Field Types
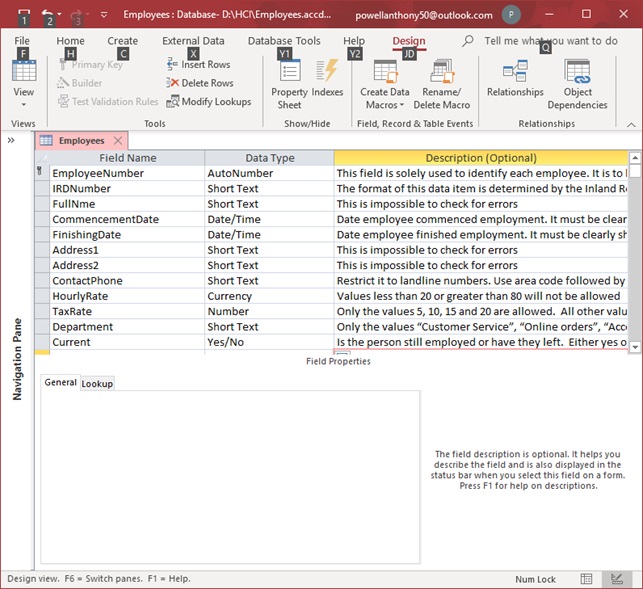
We are now ready to enter the description of our table, or in other words specify the fields and their characteristics. First in the column Field Name we enter the name of the first field – EmployeeNumber in this case. Once we do this AutoNumber appears automatically in the Data Type column. In this case this is what we want and therefore will not change it.
Fig 3
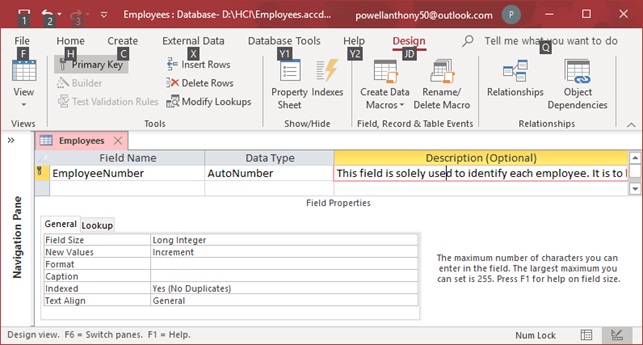
Finally, we enter a description in the Description column. Strictly speaking, this is not necessary for the normal running of the database. However, screen readers are able to access and read out the contents of this enabling visually impaired and dyslexic people to know the structure of the table. For this reason we shall enter a description for every field of the table. As we already have a conceptual model which describes the fields of the table we can simply copy and paste those descriptions into the different cells of the Description column. Fig 4 below shows part of this description.
Fig 4
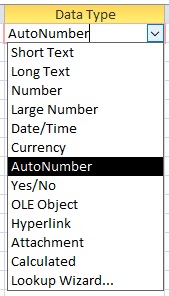
Data type
The value AutoNumber was automatically put into the first field of the table and since that is the type we wanted for our EmployeeNumber field we did not alter it. However, any table should have only one AutoNumber field and or the rest of our fields we need to use other data types
Fig 5
Fig 5 shows all of the values that we can give to Data Type. Of those we shall be using Short Text, Number, Date/Time, Currency, AutoNumber and Yes/No. We shall explain each of those values later on as we use them in context.
Below we show a completed table designed according to the conceptual model from the previous chapter.
Notice in Fig 6 that we are using Camel Script for our field names. (Camel Script refers to removing all spaces from a name and using a capital letter to signify the beginning of each word.) The reason for this is that some software applications wont accept spaces in field names of a table or else the field names must be specially formatted for them to be accepted.
However, showing Camel Script in forms or reports don’t look good as viewers would prefer to have captions with words separated by spaces. If we want to keep our Camel Script and at the same time provide users with words separated by spaces, we need to use the Caption property.
Looking at the General tab of Fig 4 one of the properties that have not been given a value is the Caption property. If this was given a value of “Employee Number”, then this would appear on forms, reports etc. instead of the field name.
All other fields, with names of more than one word should have their Caption property updated accordingly.
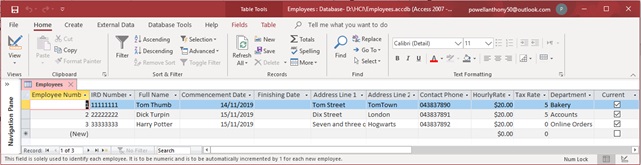
A database table is for holding data entered by the user. So far, however, we have not entered one single item. This is because we have spent the time designing the table and configuring the fields to ensure that the data entered is as correct as possible. What we have seen of the table, therefore, is the Design View. In this view we cannot enter any data, we can only specify the type and range of data that can go into the fields. Since our table is now fully designed, we are ready to start entering data into it. In order to do this, we have to go to another view of the table – the Datasheet View. In order to do this, we right click on the table tab and from the pop up menu select Datasheet View. The table now changes as shown in Fig 7.
Fig 7
Notice that instead of the actual field names appearing above the data in the fields, the values of the Caption properties appear instead.
A table is a rectangular grid in which data is stored. When a table is designed the fields are defined. This includes the data type that each field will store, the size of the field if its text, default values, validation rules and validation text. A table normally has a primary key. This is a field where duplication of data is not allowed and its contents are used to uniquely identify each record.
Automatically increments numbers for each new record
Stores alphanumeric text
Validates data entries
Creates default values for fields
What is the purpose of the “Caption” property?
To add titles to a table
To replace Camel Script field names with user-friendly names
To automatically generate numbers
To validate user input
In which view can you enter data into a table?
Design View
Datasheet View
Form View
Summary View
What is the role of a primary key in a database table?
It stores default values for records
It uniquely identifies each record
It validates user input
It determines the field size
Which property ensures visually impaired users can understand the table structure?
Data Type
Caption
Description
Field Size
What is the function of a query in a database?
To generate paper printouts
To display one record at a time
To extract specific data from tables
To define validation rules
What is the purpose of “Validation Rules”?
To provide default values
To ensure data correctness
To add captions to fields
To calculate field sizes
Which data type is used to store “Hourly Rate”?
Number
Currency
Short Text
AutoNumber
Which property is critical for screen readers to interpret database fields?
Field Name
Description
Caption
Validation Text
What type of object is used for subtotaled paper printouts?
Forms
Queries
Reports
Macros
Fill in the blanks
A database is a rectangular grid in which _____ is stored.
When a table is designed the fields are defined. This includes the data type that each field will store, the size of the field if its text, default values, validation rules and _____.
A table normally has a _____ key. This is a field where duplication of data is not allowed and its contents are used to uniquely identify each record.
The _____ property can be used to show user-friendly names instead of field names.
To design a table, you must switch to _____ View.
The _____ property is useful for describing fields for accessibility.
Microsoft Access databases can contain objects such as tables, queries, forms, and _____.
Data validation rules ensure _____ of data entry.
Data types such as Short Text, Number, and _____ are used to define fields in Access.
Fields are defined with names and _____ to specify what type of data they can store.
_____ is a tool used to extract data from one or more tables.